SpringBoot + Mybatis 연동
1. MyBatis 라이브러리 Gradle 의존성 설정
MyBatis 라이브러리 Gradle 의존성 설정을 위해 build.gradle 파일을 열어 줍니다.
그럼 dependencies라는 부분에 아래와 같이 추가합니다.
// MyBatis 라이브러리 의존성 추가
implementation 'org.mybatis.spring.boot:mybatis-spring-boot-starter:2.2.0'
runtimeOnly 'mysql:mysql-connector-java:8.0.25'

의존성 설정을 추가했다면 Gradle 싱크를 맞혀 줍니다.
아래 버튼을 통해 Gradle 싱크를 할 수 있습니다.

여기까지 완료 후 서버를 시작하면 아마 서버에서 오류가 발생합니다.
경고
No MyBatis mapper was found in '[com.example.server_01]' package. Please check your configuration.
경고
Exception encountered during context initialization - cancelling refresh attempt: org.springframework.beans.factory.BeanCreationException:
Error creating bean with name 'dataSource' defined in class path resource [org/springframework/boot/autoconfigure/jdbc/DataSourceConfiguration$Hikari.class]:
Bean instantiation via factory method failed; nested exception is org.springframework.beans.BeanInstantiationException: Failed to instantiate [com.zaxxer.hikari.HikariDataSource]:
Factory method 'dataSource' threw exception; nested exception is org.springframework.boot.autoconfigure.jdbc.DataSourceProperties$DataSourceBeanCreationException:
Failed to determine a suitable driver class
오류
Failed to configure a DataSource: 'url' attribute is not specified and no embedded datasource could be configured.

위 경고와 오류는 MyBatis 사용에 있어 추가적인 설정을 하지 않은 경우 및 설정에 문제가 있는 경우에 발생합니다.
지금부터 MyBatis 설정을 알아보도록 하겠습니다.
2. application.propertis 파일 DataSource 설정
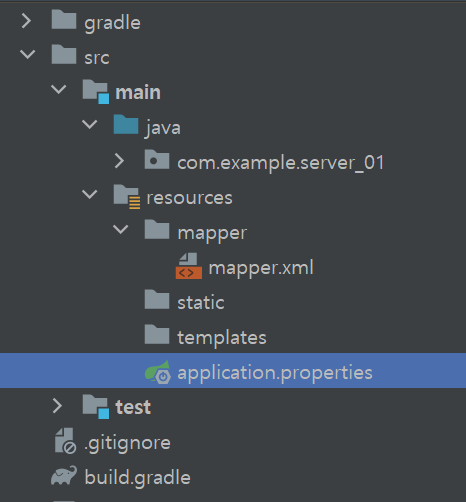
프로젝트 구조를 보시면
아래 경로와 같이
application.properties 파일이 존재합니다.
해당 파일을 여러줍니다.
src -> main -> resources -> application.properties

프로젝트를 처음 만들고 해당 파일을 열면 내용이 없을 겁니다.
이제부터 여기에 설정값을 추가하도록 하겠습니다.
application.properties 파일에 아래의 내용을 넣어 줍니다.
주항 색으로 표시되어 있는 곳에
MySql 주소 포트 스키마 이름
사용자 계정
사용자 패스워드를
입력합니다.
spring.datasource.driver=com.mysql.cj.jdbc.Driver
spring.datasource.jdbc-url=jdbc:mysql://localhost:3306/app_schema?&serverTimezone=UTC&autoReconnect=true&allowMultiQueries=true&characterEncoding=UTF-8
spring.datasource.username=root
spring.datasource.password=1234
spring.datasource.mapper-locations=classpath:/mapper/**/*.xml

3. MyBatis Java Config 파일 생성
이제 java 파일을 만들어 줍니다.
MyBatisConfig.java 파일을 만들고 아래 내용을 넣어줍니다.
package com.example.server_01.config;

import org.apache.ibatis.session.SqlSessionFactory;
import org.mybatis.spring.SqlSessionFactoryBean;
import org.mybatis.spring.SqlSessionTemplate;
import org.mybatis.spring.annotation.MapperScan;
import org.springframework.beans.factory.annotation.Qualifier;
import org.springframework.beans.factory.annotation.Value;
import org.springframework.boot.context.properties.ConfigurationProperties;
import org.springframework.boot.jdbc.DataSourceBuilder;
import org.springframework.context.ApplicationContext;
import org.springframework.context.annotation.Bean;
import org.springframework.context.annotation.Configuration;

import javax.sql.DataSource;

@Configuration
// 패키지명
@MapperScan(value = "com.example.server_01", sqlSessionFactoryRef = "SqlSessionFactory")
public class MyBatisConfig {

    @Value("${spring.datasource.mapper-locations}")
    String mPath;

    @Bean(name = "dataSource")
    @ConfigurationProperties(prefix = "spring.datasource")
    public DataSource DataSource() {
        return DataSourceBuilder.create().build();
    }


    @Bean(name = "SqlSessionFactory")
    public SqlSessionFactory SqlSessionFactory(@Qualifier("dataSource") DataSource DataSource, ApplicationContext applicationContext) throws Exception {
        SqlSessionFactoryBean sqlSessionFactoryBean = new SqlSessionFactoryBean();
        sqlSessionFactoryBean.setDataSource(DataSource);
        sqlSessionFactoryBean.setMapperLocations(applicationContext.getResources(mPath));
        return sqlSessionFactoryBean.getObject();
    }

    @Bean(name = "SessionTemplate")
    public SqlSessionTemplate SqlSessionTemplate(@Qualifier("SqlSessionFactory") SqlSessionFactory firstSqlSessionFactory) {
        return new SqlSessionTemplate(firstSqlSessionFactory);
    }

}
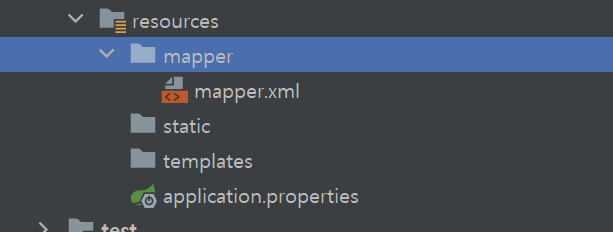
자바 파일을 만들었다면 다음으로 Mapper 파일을 만들어줍니다.
Mapper 파일은 resources 디렉터리 아래 mapper 디렉터리를 만들고 그 안에 mapper.xml
파일을 만들어 줍니다.

4. MyBatis MySql 연결 확인을 위해 API 구성
이제 클라이언트에서 서버로 요청이 들어오면 MySql 테이블을 조회해서 응답하는 부분을 넣어보도록 하겠습니다.
기본적인 구조는 Controller, Service, Mapper로 구성됩니다.
저는 요청이 들어오면 Controller에서 Service를 호출 Mapper 인터페이스를 통해 Mapper.xml에 있는 쿼리를 실행해
원하는 응답을 조회하도록 하겠습니다.
1. Controller 만들기
http://localhost:8080/api/v1/app/findAll
이라는 API 주소와 맵핑되며 POST 방식을 요청을 받도록 했습니다.
import com.example.server_01.dto.ResponseDTO;
import com.example.server_01.service.UserService;
import org.springframework.beans.factory.annotation.Autowired;
import org.springframework.http.HttpStatus;
import org.springframework.http.ResponseEntity;
import org.springframework.web.bind.annotation.RequestMapping;
import org.springframework.web.bind.annotation.RequestMethod;
import org.springframework.web.bind.annotation.RestController;

@RestController
@RequestMapping(value = "/api/v1/app/")
public class UserController {

    @Autowired
    UserService userService;

    @RequestMapping(value = "findAll", method = RequestMethod.POST)
    public ResponseEntity<?> findAll() {
        ResponseDTO responseDTO = new ResponseDTO();
        responseDTO.setResultCode("S0001");
        responseDTO.setRes(userService.findAll());
        return new ResponseEntity<>(responseDTO, HttpStatus.OK);
    }
}
ReponseDTO 객체는 임의로 아주 심플하게 만든 DTO 클래스입니다.
public class ResponseDTO {

    private String resultCode;
    private Object res;

    public String getResultCode() {
        return resultCode;
    }

    public void setResultCode(String resultCode) {
        this.resultCode = resultCode;
    }

    public Object getRes() {
        return res;
    }

    public void setRes(Object res) {
        this.res = res;
    }
}
다음은 Service 클래스 만들어 주고 Mppaer 인터페이스를 호출하도록 만들겠습니다.
2. Service 만들기
import com.example.server_01.mapper.UserMapper;
import org.springframework.beans.factory.annotation.Autowired;
import org.springframework.stereotype.Service;

import java.util.ArrayList;
import java.util.HashMap;

@Service
public class UserService {

    @Autowired
    UserMapper userMapper;

    public ArrayList<HashMap<String, Object>> findAll() {
        return userMapper.findAll();
    }
}
Controller에서 UserService 클래스에 findAll을 호출하고 Service에서 Mapper 인터페이스를 호출하도록 합니다.
다음은 Mapper Interface를 만들어 줍니다.
3. Mapper Interface 만들기
import org.apache.ibatis.annotations.Mapper;
import org.springframework.stereotype.Repository;

import java.util.ArrayList;
import java.util.HashMap;

@Mapper
@Repository
public interface UserMapper {

     ArrayList<HashMap<String, Object>> findAll();
}
위 코드와 같이 Mapper Interface를 만들어주고 다시 좀 전에 만든 Mapper.xml로 이동해 줍니다.
5. Mapper.xml 내용 구성
Mapper.xml 내용에 아래와 같이 넣어줍니다.
<?xml version="1.0" encoding="UTF-8"?>
<!DOCTYPE mapper PUBLIC "-//mybatis.org//DTD Mapper 3.0//EN" "http://mybatis.org/dtd/mybatis-3-mapper.dtd">
<mapper namespace="com.example.server_01.mapper.UserMapper">

    <select id="findAll" resultType="HashMap">
        select * from tb_user
	</select>

</mapper>
여기서 <mapper namespace는 좀 전에 만든 UserMapper Interface로 지정해야 합니다.
그리고 Mapper 인터페이스에 메서드명과 Mapper.xml에 id 값이 같아야 합니다.
그럼 findAll 메서드가 호출되면 Mapper.xml 에 id가 findAll select를 찾아 쿼리가 실행되고 resultType을 HashMap으로 하여 리턴 값을 HashMap으로 받고 하나의 데이터가 아닌 여러 데이터로 받기 때문에 ArrayList<HashMap<String, Object> 타입으로 받습니다.
현재 임의로 만든 테이블 내용은 아래와 같습니다.

그럼이 이제 서비를 재시작하고 API 호출을 해보도록 하겠습니다.
서버를 재시작하면 아까 보이던 경고와 오류가 사라진 걸 확인할 수 있습니다.
5. 서버 재시작 및 API 테스트

서버는 정상적으로 실행이 되었고 API 호출을 통해 값을 확인해 보겠습니다.
API 테스트는 Postman을 진행했습니다.
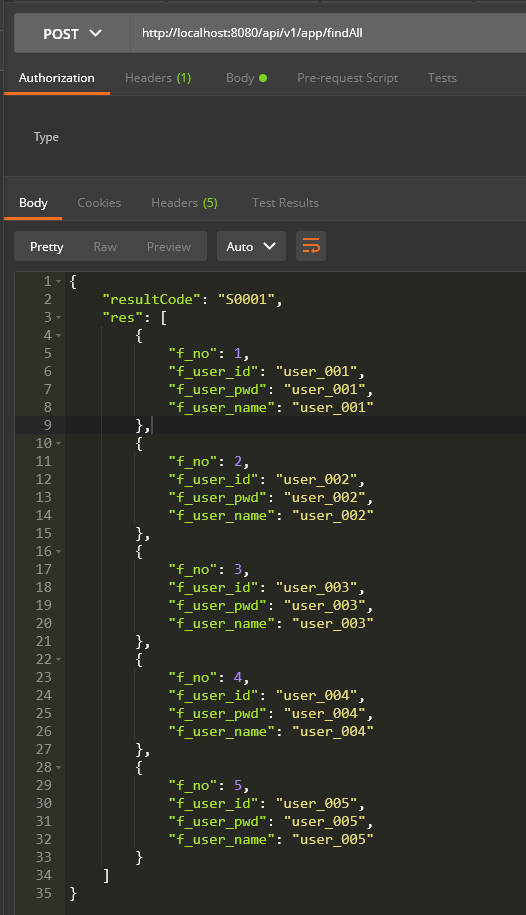
포스트맨으로 API 주소
http://localhost:8080/api/v1/app/findAll
을 POST 방식으로 호출하면 아래 이미지와 같은 정보를 확인 할 수 있습니다.
MySQL 테이블 내용이 응답 값을 전달되고 있으면 눈으로 확인합니다.

참고 : https://devncj.tistory.com/48
Spring Boot MyBatis 로 MySql 연동하기 Gradle
안녕하세요. 오늘은 Spring Boot에서 MyBatis 라이브러리를 이용해 MySql 연동 방법을 알아볼게요 우선 Spring Boot 프로젝트를 생성해 주세요. 프로젝트 생성은 생략하고 넘어가도록 할게요 저는 Gradle로
devncj.tistory.com
'Spring' 카테고리의 다른 글
| PointCut 표현식 정리 (0) | 2023.03.03 |
|---|---|
| (스프링 고급편) 스프링 AOP (0) | 2023.03.02 |
| SpringBoot + JPA 멀티 연동하기 (0) | 2023.01.12 |
| RestTemplate과 WebClient(feat. 서버 간 데이터 주고 받기) (0) | 2022.12.02 |
| (Springboot 관련) mongoDB 초기 설정 (0) | 2022.10.01 |